Showing posts with label liquitex soft body acrylic. Show all posts

Wednesday, November 6, 2013

Bloom Where You're Planted - Art Journal

I'm back with more art journaling!!  I'm working on coloring in all those sketches I did awhile back and this is actually the first one of the batch.  I sketched her, doodled all the background and the flowers during one of the shows I did last month.  The show was a bit slow in the morning but picked up in the afternoon.  Anyway, I did this very loosely not worrying about it being perfect at all.


These pages were already stained with inks when I started drawing on them.  In fact most of the pages in my art journal already have stamps, inks, molding paste and paint already on them when I start.


This is the original sketch that I shared on Facebook.  Do you follow my FB page?  I share a lot of work in progress and daily happenings there.  Here is the link in case you'd like to check it out: FB Page.  It's also the best way to ask me questions.


This is a progress pic I shared on FB when I started working on it last night.


I used Golden and Liquitex acrylics to paint her in.  She looks Eastern European to me.  What do you think?


I think this side of the spread is my fav.  I actually struggled with it so it has many, many layers of paint and molding paste.  In the end, it all works so well together to create a cheerful scene.


It's kinda funny because the left side is so bright and cheerful but she looks kinda serious to me.  Very interesting.......I'm sure there is some good psychoanalysis that can me done here, lol.

Well that's it for today!!  I have a couple more unfinished sketches in my art journal so I'll try to get them finished up so I can share.  Thanks so much for stopping by and spending a little piece of your day with me.

HAVE A BEAUTIFUL DAY!!!

Tuesday, September 3, 2013

Magenta Mask


Hello friends!!  I'm back to working on my Day of the Dead masks :D  I have to warn you, you're gonna see a lot of these along with Halloween projects for the next couple of months.  They happen to be some of my very favorite kind of projects to do so I hope you don't mind.


When I start one of these masks, I always start with the eyes and I wanted to use a really fun bright color palette for the this one.  So I reached for my favorite gouache magenta and Liquitex soft body acrylic in soft blue.


I went completely freehand on this one, no stamps.  I just try and keep things as symmetrical as possible.  I think that's really key in these Dia De Los Muertos designs.


I use Signo pens to highlight my designs.


I used sheer ribbon and white grommets on this one.  


I haven't decided if I'm going to take this down to Homestead or add it to my Etsy shop.  What do you think?  Are you guys interested in any of the masks I've made so far?  The first one with the winged heart is already spoken for but let me know if you'd like me to add this one or the one with the butterfly masked to my Etsy shop.  I'd really love your feedback.


Thanks for stopping by!  Have a beautiful day, Adios!!

Wednesday, August 28, 2013

First Dia De Los Muertos skull of the season!!

Hi everyone!!  I just finished my very first skull of the season and I have to say, I'm pretty happy with the way it turned out.   So I'm very excited to share it with and see what you think:


This is a paper mache mask that measures 8 x 5 1/2".  


I started out with this retired Paper Wings Productions heart stamp then added the beautiful wings.  The wings have been in my stash for a very long time so I don't remember who they're from, sorry.  The winged heart set the tone for the rest of the skull and my color choices.


I added the flowers around the eyes, the nose and mouth freehand.  All of the paints I used are Liquitex soft body acrylics.


The rest of the flowers are from Paper Wings Productions' Flower Power stamp set.  As I mentioned the other day, this stamp set has quickly become one of my favorites.


I used distress markers for shading and a Uniball Signo pen to outline the images.  I also added Stickles to the wings for a little sparkle.


One down, a gazillion to go, lol!  Let me know what you think!!  Thank you so much for stopping by today.  

HAVE A BEAUTIFUL INSPIRED DAY!!!
Friday, July 12, 2013

Free Spirit

Happy Friday Everyone!!  Today I have a really fun mixed media canvas to share with you.  If you follow on Facebook, then you've seen me working on this one during the week.  I finished up and I'm ready to share my "Free Spirit".


This is a 11x14 canvas and I just let loose with color.  This week was the first time that I was able to get back into the studio and just play in a very long time.  


So when I sat down, I pulled out my bin of scraps and just started gluing them on.  Then I slapped on a layer of gesso over the whole thing.


With the gesso dry, it was time to add COLOR!!  I used various shades of magenta and orange Golden Fluid Acrylics.


After that, the FUN really started!!  I did some stencil work with Dylusions ink and a Heidi Swapp stencil.  Then I used a DecoArt 3-D writer to doodle all the circles and India ink for the black flourishes.  


I continued to add color and some doodle work. 


I used a Stampers Anonymous stamp for the face.  Since the stamp is squared off on the top and the right side, I drew in the rest to give me a complete head.


I topped her off with a nice bright scarf  made with scraps of a tag that I made using  a Paper Wings Productions stamp.


I used a jumbo Stampedous Rose stamp for her hair colored with Prismacolor pencils and Dylusions inks.


Then I added some beads to finish off her boho look.  I also stamped a sentiment here and there that's meant to be part of the background.


I love the mixture of bold bright colors and patterns on this canvas.  I debated muting them a bit to help establish the focal image but then decided to leave it as is so.  I think she blends perfectly with the background to tell a complete story.


Thanks so much for stopping by and have a BEAUTIFUL weekend!!!

I entered this project in An Inky Situations: Linky Party 1 Anything Goes
&
Simon Says Stamp and Show A Little Stamping Challenge

Thursday, July 11, 2013

Urban Angel

Hello my crafty peeps!  Today I have a new mixed media canvas to share with you.  I think I'm gonna call this one "Urban Angel" because the background feels urban to me.  What do you think?


This is an 8x8 canvas that I started back in April with the Paper Wings Productions April in Paris  & March Mixed Media kits.  I transferred the clip of the lit merry go round onto the canvas but my background was to dark so it didn't show up very well.  I tried to keep going but I got stuck and it ended up sitting on my self for the last few months.  Then a couple of nights ago I decided it was time to finish it up!


I started out giving the background a nice blue wash with Liquitex soft body acrylic paint and then added some texture with the circle stencil from my PWP April Mixed Media kit.


Next I did that transfer I was telling you about.   Since it didn't show up well I decided to add the heart.


This sweet little angel is from the PWP March Mixed kit and can also be purchased individually on the clip art sheet here.


So to finish it off, I decided to simply add some stencil work behind the heart, drips and splatters of white ink, some random stamping and outline the heart.


Sometimes you just have to walk away from a project or just let it sit for awhile to get a fresh perspective.   This canvas turned out completely different from what I imagined but that's okay.  To me art is a living thing that takes on it's own life and directs me on how to complete my project.  All I do is stay open minded and go with the flow!!

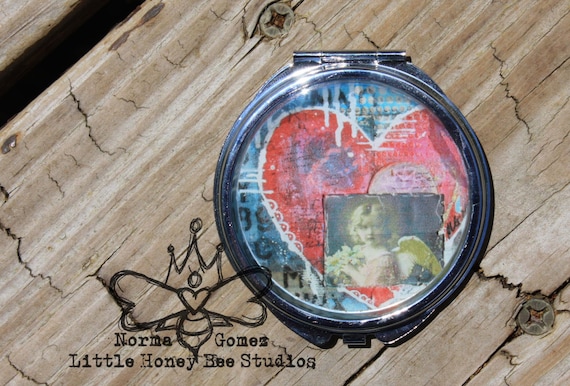
Compact Pocket Mirror - Mixed Media

This canvas in also available is this beautiful little pocket mirror.  You can pick one up in my Etsy shop: Little Honey Bee Studio.

Well thanks for joining me and have a WONDERFUL day!!!


Wednesday, July 10, 2013

Illustrated Stories & Sketches - Art Journal Page, Zeus and Zoe

Hey friends, today I'm sharing my last post as an official Zeus and Zoe team member so I'd like to take a moment to thank Marivic for the giving me this wonderful opportunity.  I have truly enjoyed working with the incredibly talented  Zeus and Zoe Design Team and all of the fabulous Zeus and Zoe products!!   A huge thanks to all of you too for your support during my Zeus and Zoe term!!!!!


For my last Zeus and Zoe project, I really wanted to share something fun in my favorite mixed media style so I created this colorful art journal page.


My background was already started with left over sprays and stencils so all I had to do was pick a focal image.  I chose to use this beautiful vintage lady from my Zeus and Zoe kit.  I colored her in using Prismacolor pencils, distress inks and markers, Liquitex soft body acrylic paint and a Faber-Castell brush pen.  I simply fussy cut her out of the paper and glued her on to my colorful world ;D


I added swirls with Golden Molding Paste and a DecoArt stencil.  Then doodled around the top and bottom of the page.  I added pops of color with Golden Fluid acrylic paints.  The fluid acrylic adds tons of color while allowing the colors underneath show through.


I added bits of vintage news papers from my Zeus and Zoe kit to create my title and for scallops along the inseam of the page.


I doodled flowers here and there to add some yellow as an accent color.  I wrote "Dare to dream in bold bright colors" along the top.  I imagine that this is the way my vintage lady sees the world.  I have to say, I'm so loving this art journal page!!  It makes me very happy with all of its bright colors and doodles; it's how I see my world, lol.  

Well friends, thank you so much for visiting with me today!!  I hope my art journaling makes you smile too, HAVE A BEAUTIFUL/COLORFUL DAY FULL OF INSPIRATIONS!!!

HUGZ!!!

I've entered this project in the DL. ART Thankful Thursday July Linky Party
&
Five Simple Things' Inspire Me Friday 110 Anthing Goes Link Up

Thursday, September 13, 2012

Halloween Friends

Hey bloggie friends!  Remember my little Halloween cutie from yesterday?!  Well it's time to meet her little friends ;D

I decided to make the rest of them into ornaments.  They were all painted with gesso then with some Liquitex soft body acrylic in Metallic/Iridescent White.

Here is a close up of our little star.  

This is her buddy but she's not as happy....maybe she want's to be the star of the show, lol.

I covered this one with book text that I stamped with various Halloween stamps.

This one went to LSU, lol!

Here they are just hanging out!  I think they need names don't you.  Maybe you can help me name them, so leave me some suggestions!!

The girls and I wish you a beautiful and creative day!!

ADIOS!!

Thursday, March 1, 2012

Do What You Love

Finally finished this painting up.   The sentiment was inspired by my new friend Christina.  It's a 11x14 canvas, I used a piece of tile that I found in our backyard, a doily, printed packing tape, vintage sheet music, acrylics, gouache, gel medium, cardstock and rubons.  Christina thanks for the inspiration, I hope you like it:


   I used Golden Fluid Acrylics:Quinacridone Magenta & Primary Magenta then I added in Liquitex Soft Body Acrylic in Naphthol Crimson

This is Golden Fluid Acrylic: Titanium White

I used printed packing tape that I found in Michael's Dollar area and sealed it with Golden Regular Gel Matte.
   
 I add some Creative Imaginations rubons and some Liquitex Soft Body Acrylic in Ivory Black

This is the broken piece of tile I found.  I thought the back had an interesting pattern so I added some Golden Fluid Acrylic in Yellow Oxide with my brayer and stamped it on my canvas

I also used a doily as a stamp with my Ivory Black paint and bubble wrap with Gumbacher Gouache in Cerulean Blue

The letters are rubons that I put on white cardstock and inked with Tim Holtz Distress Ink is Black Soot then attached with Golden Gel Medium

Thanks for checking it out!
Related Posts Plugin for WordPress, Blogger...