Showing posts with label 3-D Gloss Enamels. Show all posts

Wednesday, January 15, 2014

Bloom Where You're Planted

Hi everyone!!  I'm finally ready to share my latest canvas with you.  I've been working on this piece a little here and a little there since New Years.  


My inspiration for this piece was this art journal page:


I really loved the bright colors and whimsical flowers so I wanted to recreated them on a canvas.  So with a very loose idea of what I wanted, I began to play.


This is a 12x12 canvas that I painted blue and green.  Then I went to town doodling my flowers.  I added my usual 3-D enamel flourishes because no piece would be complete without them, lol.


Then I just started painting the flowers and layering colors.  I loosely doodled in and around the petals in between each layer of paint until I was happy.


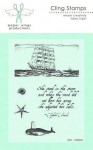
I debated whether or not to add the sentiment and in the end just decided to go for it since it's what inspired me in the first place.


I pretty pleased with it!  I love the bright color and fun shapes.  So there you have it, my 1st official canvas of 2014!!!  Thanks so much for joining me today and have a beautiful day!!

Wednesday, December 11, 2013

Shine - Mixed Media Canvas

Merry Christmas everyone!  I hope this finds you nice and warm.  Yesterday was a bit of a struggle for me so I got into the studio to relieve some stress.  Being creative is the best medicine in the whole world, don't you think?  Well it is for me and my soul was in need of it.  Don't get me wrong, we're all good here but sometimes (certain times of the month) I'm a bit of a mess over things that don't even matter.  Hopefully you can relate, lol.  Anyway, enough venting right!  I pulled out an old canvas that I never finished.  This one has been sitting here for months.  I had a vision for it but it didn't work out so I benched it.  So whenever I need to relieve some creative steam, the unfinished pieces are the ones I reach for and this is what I came up with:


This is an 8x10 canvas that I applied a layer of crackle paste to and then debossed into.  It was an experiment and it didn't really turn out like I thought it would so that's why I never finished it. I framed the edges using 3-D enamels, love that stuff.


Since I was feeling a bit down, I started researching angels and I found this beautiful image of a child angel.  I began sketching with the little girl in mind but of course it was my character that appeared.  It's funny how we all have different women that always appear in our artwork.  I may change the hair and eye color but they all have the same characteristics.


All of my canvases tell a story of what I'm going through and this one is no different but I'll keep it to myself so you can find your own meaning.


We all have something we're passionate about, a fire that burn inside but sometimes we need a little encouragement to let it out: I know that your's will Shine so brilliant it will be blinding.  I didn't plan on this quote but if found me as I dug through me stash and just seemed so perfect.


This piece is a mixed of crackle paste, acrylic paints, sketching, stamping, markers, pens and rubons.


It's loaded with rich texture and beautiful layers.


Thank you so much for joining me today and don't forget to let you light SHINE bright for the world to see.

HUGZ and Blessings to you all <3

Friday, November 15, 2013

Psalms 91:4 - Mixed Media Canvas

Happy Friday Everyone!!  Today I have a new canvas to share with you.  I finished this last night and I'm very happy with the way it turned out.  I love the Psalms verse I used, it goes beautifully with my little scene.


This is a 9x12 canvas.  The background is a mixture of warm golds and muted greens.  


For texture, I used molding paste and a stencil then continued to add layers of paint.


I added the cross and used 3-D Enamels paint to add swirls.


At this point, I really felt like the painting needed more and I wanted some contrast so I added this cardinal perched on a tree.

   
I knew when I started this piece that I was gonna feature a bible verse but I didn't have one in mind.  I never plan my paintings because I like for them to evolve as I work.  This free process is what I enjoy most about creating.  So once I feel like I'm done, I begin searching for the right words.  Sometimes their my own, sometimes I use a quote or a bible verse like this.  So as I was searching, I prayed.  I asked God to help me find the right words, to help me share his word and I found Psalms 91:4.

He will cover you with his feathers
He will shelter you with his wings
His faithful promises are your armor and protection.


The verse is perfect for my painting and I love it!!  Thank you so much for joining me today.  I hope you've enjoyed my post and that you have a wonderful weekend.

Sunday, July 14, 2013

By the Sea Tag

I had fun getting nice and messing creating this "By the Sea" tag over the weekend.  I've been playing around with a new debossing technique and I think I finally got it down but more on that later (wink, wink).  Anyway, here is my tag!


It's got kind of tear drop shape because I layered a torn piece of cardboard on my tag.  To create this tag, I use the Paper Wings Productions July Nesting Components kit, Lindy's Stamp Gang inks, #10 tag, cardboard, molding paste, stazon, twine and the Cricut Stand & Salute cartridge.


I started out by applying molding paste to the tag and cardboard then stamping the fish stamp from the Seaside stamp set.  Next I spritzed everything with Lindy's Stamp Gang inks.


I cut the anchor at 3.5" using the Stand & Salute cartridge and then embossed it with Zig metallic embossing powder.  The embossing powder really gives it the look of iron don't you think?!  After that, I just wrapped some twine around the anchor.


I fussy cut a couple of the clip art images from the kit.


I added some of the beautiful embossing powder from the kit around the edges and some of the rubons throughout the tag.


I also tucked in some white washed Pink Paislee Luxe Circles from the kit and tied the gorgeous trim to the tag.  I love the irregular shape and all of the texture that I was able to work into this tag.   The sea theme of this kit is just so much fun to work with!!  If you'd like to pick up your own kit, visit the Paper Wings Productions online store HERE.   You could even pick up the Lindy's Stamp Gang inks I used on this tag there.

Well friends, thanks so much for joining me on this little trip down by the sea!  Have a beautiful day!!!!

Entered this tag in the Paper Playtime Challenge #14 Tags


Friday, May 10, 2013

Daisy - Paper Mache Heart

Happy Friday Everyone, we made it to the weekend!!  I hope you had a great week and are gonna have an even better weekend with your loved ones.  I'll be out at the SoFlo Market on Saturday so if you're in my area, come on down, I'd love to meet ya!  

Now let me introduce you to my friend Daisy.  She is a fun loving girl that always looks on the bright side of life.  I'm not to sure about her choice in lipstick though, I may have to talk to her about that.  What do you think, do you like her lip color?

I really like her hairstyle, I need to wear my hair like that one of these days!

My favorite black Signo pen ran out on me when I was working on this one.  I had to use my Faber-Castell brush tip pen so I ended up with bolder outlines on my accent flowers.

 I think this heart is so fun with its bright color palette.  Daisy makes me smile :D    Here she is hanging out with a couple of her girlfriends waiting to go to the market:


Well friends, thanks so much for joining me today!  Have a fantastic weekend!!!

Tuesday, May 7, 2013

Let it Be - Paper Mache Heart

I'm on a roll with these hearts!  This is the other one I finished on Sunday and I have to admit, I really love this one!

I love the blue with the pops of white and red.  I think she's just beautiful and I love her full wild hair too.

This one is so fun and summery to me, love, love, love it!

Here's my last three all together but this batch is not complete.  I have two more almost done and one more to go after that.  So hopefully I'll have six of these ladies to take to the market on Saturday.

Here's a look at my first four just for fun!
Which one is your favorite so far?  Do you think I should try to make more than one of any of them?  Let me know your thoughts, I'm all ears ;D

Thanks for stopping by and checking out my hearts!  Have a Beautiful Day!!

Wednesday, April 3, 2013

Trust - Mixed Media Paper Mache Heart

Wow, it's Wednesday already?!  Yikes, the week is flying by!!  I hope you all are having a wonderful week so far.  As I mentioned yesterday, I had a chance to work on another paper mache heart over the weekend.  So this makes II in my Heart Series:

My inspiration for this heart came from another project I've done recently.  (I'll share that one soon)

I started by layering book text, then adding fluid acrylics and 3-D Enamel flourishes.  I really love adding them to my projects ;D

Next I drew and painted her in.  I really had fun creating all those beautiful curls.  It's funny because when I draw a person my husband always asks "who is that".  I don't draw with anyone in mind but I do add a couple of my features.  So all of my "ladies" will always have a mole under their nose and full lips like me. ;D (granted I make their lips much larger, lol).

I've been in need of some meditation lately so her closed eyes and the sentiment I chose reflect that.  My work is always a reflection of who I am, what I'm feeling and the colors of my soul at the time.

I hope you liked the second installment of this series.  If you missed the first one, you can check it out HERE.  I'm entering this project in the Simon Says Stamp & Show - Absolutely Anything Goes Challenge.

Thank you so much for stopping by and for all your sweet comments!  May your day be beautiful and filled with inspiration!!


Tuesday, March 19, 2013

Be True - Mixed Media Paper Mache Heart

I finished the large paper mache heart that I started on Sunday.  Check it out!!

I love the way it turned out!!  I usually don't draw people or anything really on my projects but when I first saw the paper mache heart, I immediately imaged this kind of image.

I started out by prepping the heart with a layer of gesso and then I drew my focal image.  After that I added some texture with molding paste and a stencil.  Next came all the layers of color and my favorite 3-D Enamel swirls.

With the background off to a good start, I moved onto coloring her in.  I wanted her to have an ethic flair ;D

I added tons of rose and flourish rubons and a Tim Holtz heart stamp.

It took me awhile to figure out what I wanted to say and then it came to me, "Be True To Who You Are".  I added "Courage" to the TH stamp after that because it takes courage to be true to yourself.   I chose this quote because it expresses how I feel right now.  It's been just over a year since I've returned to the "creative" world.  I've always had a passion for creating but as you all know, life sometimes gets in the way.  So it had been years since I'd done any kind of creating and I was feeling unfulfilled.  I began soul searching and decided that what I needed to do was to get back in the studio and be true to myself.  I dived right in and launched Honey Bee Studios and I've been so happy with where this journey is taking me.

These days I'm even finding the courage to actually draw again :D  I still have a few more of these hearts so I see a series in my future!!  Well friends, as always, THANK YOU so much for stopping by and for all the sweet comments you leave!!

Have A Beautiful Day!!!

I entered this project in the DL.ART Thankful Thursday - March Linky Party

Related Posts Plugin for WordPress, Blogger...