Showing posts with label Cricut. Show all posts

Sunday, July 14, 2013

By the Sea Tag

I had fun getting nice and messing creating this "By the Sea" tag over the weekend.  I've been playing around with a new debossing technique and I think I finally got it down but more on that later (wink, wink).  Anyway, here is my tag!


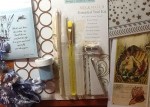
It's got kind of tear drop shape because I layered a torn piece of cardboard on my tag.  To create this tag, I use the Paper Wings Productions July Nesting Components kit, Lindy's Stamp Gang inks, #10 tag, cardboard, molding paste, stazon, twine and the Cricut Stand & Salute cartridge.


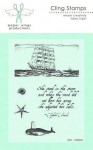
I started out by applying molding paste to the tag and cardboard then stamping the fish stamp from the Seaside stamp set.  Next I spritzed everything with Lindy's Stamp Gang inks.


I cut the anchor at 3.5" using the Stand & Salute cartridge and then embossed it with Zig metallic embossing powder.  The embossing powder really gives it the look of iron don't you think?!  After that, I just wrapped some twine around the anchor.


I fussy cut a couple of the clip art images from the kit.


I added some of the beautiful embossing powder from the kit around the edges and some of the rubons throughout the tag.


I also tucked in some white washed Pink Paislee Luxe Circles from the kit and tied the gorgeous trim to the tag.  I love the irregular shape and all of the texture that I was able to work into this tag.   The sea theme of this kit is just so much fun to work with!!  If you'd like to pick up your own kit, visit the Paper Wings Productions online store HERE.   You could even pick up the Lindy's Stamp Gang inks I used on this tag there.

Well friends, thanks so much for joining me on this little trip down by the sea!  Have a beautiful day!!!!

Entered this tag in the Paper Playtime Challenge #14 Tags


Friday, February 1, 2013

February PWP DT Blog Hop!!


Happy Friday & WELCOME to the February Paper Wing Production's Design Team Blog Hop!


If you've arrived here from Dana's Blog, then you're in the right place but if you just happened to stumbled onto the hop, please start HERE.

This month we’ve whipped up some “LOVE”ly projects and we’re even sharing the “Love”!  One lucky follower will win this fabulous blog candy AND the chance to be featured as a guest designer in a future hop!! 


For a chance to win, all you’ll need to do is:
Be a follower of the Paper Wings Productions blog The Aviary, visit each of the design team's blogs (including our guest designer) and leave a little bloggie love Then go back to The Aviary and leave a comment letting them you completed the hop.  For extra chances to win, just like the Paper Wings Productions Facebook page and/or invite your friends to the hop.  Then just come back and let us know!  Be sure to leave a separate comment for each of the additional entries.  The winner will be announced on Tuesday, February 5th on the Paper Wings Productions blog.

Ah....LOVE is definitely in the air and I'm having a blast playing with all of beautiful shades of pink, red and cream.  They've been my go to colors for all of my recent projects and this one is no exception :D  I created a beautiful little banner that can be used anywhere you'd like to add little Valentine's Day decor:

To create this banner, I used my Cricut Pretty Pennants cartridge.   I cut the canvas using banner 1 at real dial size 7.25".

Next I spritz the canvas using a polka stencil and Tattered Angels Viva Pink Glimmer Mist.  Once the mist was dry, I randomly stamped the PWP Writing Cling Stamp and the Eiffel Tower with Stazon.  Then I ran each of the banners through my sewing machine, stitching along the edges with red thread.

This cute little lady is from the Princess stamp set.  I did some paper piecing on her skirt, colored with Primacolor pencils and highlighted with Stickles.  The heart is cut with the Cricut Accent Essentials cartridge and embossed with my Cuttlebug Swiss Dots embossing folder.  For some extra texture, I added white washed corrugated cardboard to the inside of the heart.

I added "ooh la la" and "Je Taime" from the Paris Stamp Set on each of the banners.

I cut all of the letters out of My Mind's Eye Lost & Found papers with the Cricut Script Font cartridge.  Each of the letter are cut at 5" and shadowed with black cardstock.

To dress up my banner, I added scraps of red fabrics and ribbon.  I also added some clear beaded trim and the banner is hanging on jute string.

I hope you liked my Valentine's Day Banner!  Be sure to head on over to Tara's Blog next, she has a BEAUTIFUL project to share that you won't wanna miss!!

Here is the complete line up just in case you get lost along the way:
Dana Tatar - http://datatar.blogspot.com/
Norma Gomez - http://lilhoneybeestudios.blogspot.com/------YOU ARE HERE
Tara Chaussee - http://secretbeesstudio.blogspot.com/
Amber Rasmussen - http://sew-ink.blogspot.com

***then go back to PWP and leave a comment http://paper-wings-productions.blogspot.com/***

THANK YOU SO MUCH FOR JOINING US TODAY

&

Let Your Creativity Take Flight!


I entered this project in the following challenges:
Simon Says Stamp Anything Goes Challenge
Whimsical Designs "All About Love" Whimsical Wednesday Challenge


Wednesday, January 23, 2013

Make a Wish!

Happy Wednesday!  I hope your week is going smooth so far, ours has been great.  We celebrated my grandson's 2nd birthday on Monday so I spent yesterday with him enjoying his new toys.  I got some really great pictures too and wanted to scrapbook.  So I pulled out my little portable HP photo printer (my big one broke) and started printing some pics.  It's been so long since I scrapbooked that I didn't know where to start, lol.  Then I realized that I should just do what I do on all my other projects, doodle, stencil, fussy cut and mist!  


The background paper is BoBunny and I doodled around all the edges.  Next I pulled out the Donna Downey stencil that came in my PWP January Mixed Media kit, some gesso and randomly stenciled. I have to tell you, I've used a lot of stencils and this has to be one of the best ones I've used.  It was thicker and stayed to really good as I was stenciling.  


I cut some scraps of yellow and red papers, ran them through my sewing machine and inked the edges.  I matted my photos with paper from the My Mind's Eye Party Time Paper Pack and of course I had to add a little cardboard.  I used a lot of stickers off of the Deja Views Birthday pack.


I used Mickey and Friends to cut the number two.  To finished things off I did some journaling.  It felt really good to do some scrapbooking.  I definately need to start scrapping our special moments again.  Thanks so much for stopping by, HAVE A BEAUTIFUL DAY!!

Thursday, January 17, 2013

Hello My Love - Card

Hey there friends!  I've got a new card to share with you today.  I completed this one last night and planned to share it early this morning but omgosh.....I woke up feeling like death.  Thankfully my DH stayed home to help with my grandson and I'm starting to feel better now.  (Thanks honey, love you)

Okay now onto my card ;D

I actually made this card to enter into the Simon Says Black, White and another color challenge but I missed the deadline (hate when that happens).  I chose to use black, white and red.  Boy this was harder to do than I thought it would be.  I guess because I love playing with the whole box of crayons and love loads of contrast.
For this card I started by cutting Card #2, Layers from the Sentimentals Cricut Cartridge from white cardstock.  Next I cut black cardstock for my base and stamped it with a Metallic Pearl Dabber.  I believe the stamp I used is Inkadinkado.  I stamped the white cardstock with two shaded of red Colorbox ink and a Recollections stamp.  Then I inked it with Tim Holtz distress inks in Fired Brick and Festive Berries.  I also ran it through the sewing machine to add an extra little detail.  I added some glitter embossed swirls for a little framing and doodled around the edges.  I finished this off with some inked ribbon, a charm, sticker letters and a heart cut with Cricut Accent Essentials.  I also ran it through the swiss dots embossing folder.

Thank you so much for stopping by today and WELCOME to my newest bloggie friend Mallrat!!
HAVE A BEAUTIFUL DAY!!

Friday, December 28, 2012

The Aviary: Feature Friday is Tagalicious!

I'm sharing a New Year's Eve tag over on The Aviary today!


The Aviary: Feature Friday is Tagalicious!: Happy Friday Everyone, Norma G. here with a little inspiration to kick off the weekend!!  That's right its..  Are you ready for the we...

Saturday, December 22, 2012

Owl Be Home For Christmas Blog Hop!

Hello Friends!  Welcome to the Owl Be Home For Christmas Blog Hop!! 
We are so happy you are here! Please be sure to start at the beginning at Heather Lynn's blog so you don't miss out on a thing!  We have all made some super cute owl themed projects to share with you today! You will not only get some inspiration~ but you could win prizes, too! Heather Lynn is offering one hopper a really fun prize. You must FOLLOW and COMMENT at all of the stops to have a chance to win the Grand Prize! There will be lots of other candy offered along the way! Please take your time and visit all of the blogs! You have all weekend to do so. Please be sure to let us know at the last stop (at Pinque Peacock) that you followed the rules to be included in the random drawing for the Grand Prize!


Today I have a super sparkly Owl ornament to share with you :D

 This ornament started out as a Laughing Cow cheese spread container. I love those things so I have A LOT of containers saved up for projects. I'm so glad I was finally able to use one so my DH can't call me a hoarder anymore, lol.  

I started out by attaching some SEI Alpine Frost patterned paper to the inside of the container.

Next I added gold sequenced ribbon to the inside to help reflect some light. You can kind of see it here. I added the same sequenced ribbon to the outside of the container. Next I started working on my little owl.

To make my owl, I drew him out on the same SEI Alpine Frost paper I used on the background. Then I used some Studio G glitter glue to outline and add details. For the eyes, I used a circle punch and gemstones. All of the edges are inked with Festive Berries TH Distress Ink. To make the tree branches, I stamped a small piece of a brown paper bag with a wood grain print, then I rolled it up and added some Pearl acrylic dabber paint.

I cut the poinsettias with the Cricut Flower Shoppe cartridge using my favorite vintage sheet music. (Come on, you know I HAD to use some, lol.) I also tucked in some miniature snowflake ornaments (I'm loving those right now), tiny roses, and Industrial Chic beaded charms.

Here's a look at the gold sequenced ribbon on the outside of the ornament. I also added some gold tinsel trim for a finished look. I cut a scalloped circle for the back using the Cricut Sentimentals cartridge. The green patterned paper is from the SEI Alpine Frost collection. I drilled a hole on the top using my Dremel and used a beautiful sheer gold ribbon to hang.

I hope you've enjoyed my altered Laughing Cow container project!  
Before I send you off to the next stop I have a little Holiday themed blog candy to share:
For a chance to win, all you have to do is be a follower, leave a comment and for an extra chance, just like my FB page then come back and let me know!  You'll have until 12am CST, Tuesday, December 25th, 2012 to enter so good luck!  I'll post the name of the lucky winner on Wednesday, December 26th, so be sure to come back and to see if you're the lucky winner!!

Here is the wonderful line up we have for you this weekend!

Heather Lynn-http://heathernovinger.blogspot.com/
Teresa-http://www.createenjoyshare.blogspot.com/
Jenn-http://scraphappensembellishit.blogspot.com/
Jessica Esch~ http://chick-n-scrap.blogspot.com/
Ashley - http://thebloghopprincess.blogspot.com/
Lisa - http://indymermaid.blogspot.com/
Melissa Kelsey - http://kelseymel.blogspot.com/
An'Jenic Gibson - http://anjenicgibson.blogspot.com/
Cindy- http://www.cindys-greencricut.blogspot.com/
Julie- http://jk-littlebitofbling.blogspot.com/
Joe- http://scrapbookjoeblog.blogspot.com/
Christina Capps - http://cema1cema.blogspot.com/
Janet R -http://janetscreativeworld.blogspot.com/
Paula http://scrapyourworld1.blogspot.com/
Tara-http://www.craftindesertdivas.blogspot.com/
Heather D.-http://joemamainks.blogspot.com/
Norma-http://lilhoneybeestudios.blogspot.com/ -------YOU ARE HERE!
Pinque Peacock-http://pinquepeacock.blogspot.com/

Thank you so much for joining us today!!!
HAVE A BLESSED DAY & MERRY CHRISTMAS!!!

Friday, December 14, 2012

Merry Texmas!

Welcome to the weekend friends, we made it!!!!!  Lol, let the good times roll, let's get this party started, etc..........!!!!  This weekend I'm very excited to be participating in the Shrooms & Blooms Blog Hop along with an amazing line up of talented ladies.  This was such a fun theme to work on and I can't wait to show you what I came up with.  All of the projects are gonna be super fun and of course you know, there is gonna be AWESOME blog candy along the way too!  Thanks to Paper Wings Productions, I'm gonna be sharing one of my favorite PWP stamp sets with one LUCKY winner!  So make sure you stop by and leave a comment tomorrow!!

Okay, so remember the Peace on Earth Reindeer?!  Well I liked how it turned out so much that I went and all the ones Michaels had left on the shelf.  When I was showing my DH, he said "you need to make one with the Texas flag" so that's exactly what I did. 

Cute, right!  The blue patterned paper is from the Paper Studio Vintage Nation paper pack and the red and white papers are from my scrap bins.  I use the George Cricut cartridge to cut the star and used a Faber Castell pen to add faux stitching all around.  I've taken this down to Homestead so hopefully someone will love it enough to give it a new home ;D

I wanna WELCOME Summer_Sunset54!!  Thank you so much for stopping by my blog and deciding to follow along!  I really appreciate all of you & love reading your sweet commments!!

HAVE A WONDERFUL DAY & I'LL SEE YA TOMORROW AT THE HOP!!!

Friday, December 7, 2012

Frida Christmas Ornament

Happy Friday bloggie friends!!  I've got a late post for you today of a really cool project I finished up last night using my fabulous PWP stamps!

Here it is hanging on my tree :D

I used the Frida stamp on the PWP Muertos Stamp set for this project.  I stamped her with black Stazon and colored her with Prismacolor pencils.  For the red glitter, I just used some Michaels glitter glue.

I cut the base of the ornament with the Cricut Christmas Cheer cartridge.  Next I ran it through my Cuttlebug to emboss.  I also used Spellbinders Nestabilities Beaded Circle and punched holes around all of the edges.  The little charms are from Traditions Beads and Bead Landing.  The ribbons are from my stash.

I inked around all of the edges then doodled around the ornament edges.

The beautiful sentiment seemed to go nicely with Frida don't you think!  You can find it on the PWP Christmas Sentiments and Waves Magic Cling Stamp Sets.

I've entered this project in DL.ART Thankful Thursday Challenge : Anything red and/or green

That's it for now!  Have a Wonderful Weekend!!

Tuesday, December 4, 2012

Peace on Earth Reindeer

Hey there friends, today I have a fun new project to share with you.  This is a wooden reindeer hanger from Micheals.

I bought this weeks ago but had no idea what I would do with it.  Last night I sat down in my studio not really feeling crafty but I forced myself to create something and I'm so glad I did.  I used MME Lost & Found on the antlers and SEI Alpine Frost on the face.  Next I outlined the antlers with a ZIG writer in chocolate and inked all the edges with TH Vintage Photo. 

I used the Cricut Stand & Salute cartridge for the banner.  It's cut at one inch and inked with TH Vintage photo.  The stamp I used is by PWP and can be found on the Christmas Sentiments Cling Stamp set and the Typed Wishes Cling Stamp set.

Here is a closer look at that beautiful SEI paper.  

Thank you so much for stopping by today and for all your well wishes for my father.  I truly appreciate all of your thoughts and prayers.

HAVE A TERRIFIC TUESDAY!

Friday, November 30, 2012

The Aviary: Where you can find us this weekend!!!


I'm so excited to be joining Carrie, Liz and Beth over at Stamp Antonio this weekend for my very first PWP event.  Here is a sneak peek of the ornament I did for one of the FREE make and take projects.  Follow the link below for all the event details and to see the complete project ;D

HOPE TO SEE YOU THERE!!!!!!


The Aviary: Where you can find us this weekend: Happy Friday Peeps- This weekend Paper Wings Productions will be at two places at once!! First, we are hosting a FREE all day event at ...

Thursday, November 29, 2012

Christmas Hanger

Hello, Hello friends!  How has your week been going?!  Well I hope it's going better than mine is.  

***DISCLAIMER: I'm about to do a little venting, so just skip to the next paragraph if you're not interested ;D*********
To say that my week has been stressful would be an understatement right now.  My dad had surgery this week but I couldn't go see him because my son came down with a sinus and ear infection.  So while he was in surgery, I was at the doctor with my little one.  Then there were other major work and family stressers that I'd rather not get into.  I did manage to get into my studio and cranked out two new projects.  You know what they say, crafting is cheaper than therapy, lol.   Yes, I know what you're thinking....whoa is me, lol.  I guess I just needed to get it off my chest a little, so thanks for listening ;D 

Okay, know for some crafting!  I completed an ornament that I'll be using as a make and take project for PWP on Sat.  I'll share a pic of that as soon as I can, but for now, here is the other project I finished last night:

This is a little hanger that I made using a chipboard album that I bought at the dollar section of Michaels awhile back.  I just punched a second whole so I could hang it.  

Here's a closer look at the beautiful PWP stamp I used.  You can find this stamp on these two sets: Jolly Old St. Nick & Saint Nick.  While I was working on my ornament, I ended up cutting a lot of circles in different sizes so I could figure out what would work best.  So I decided to try and use them up.  I ran the red circle through my Cuttlebug to emboss, then inked it up with some gold ink to add some more depth.  I was having trouble getting the white circle to adhere so I sewed it on.  Please excuse my wonky sewing, lol.  

Next I found the perfect die cut on my DIL's workspace, sorry don't know who it's by.  Originally I thought I was gonna make a card but the die cut just seemed to big.  That's when I started digging through my stash and found the chipboard album.  I covered it with mauve colored cardstock to keep with the Victorian feel of the stamp.  Then just outlined the edges with red stickles, added some ribbon and wa la, done :D

That's it my friends, thank you so much for stopping by!  
Have a beautiful day!!!!!
Related Posts Plugin for WordPress, Blogger...